Monday, August 31, 2009

Change Orders simplified

JobOrder has a complete Change Order system. To enable it, please select System Preferences: Jobs 2: Related Areas displayed in Jobs: 'Change Orders enabled in individual Jobs'.


The complete Change Order system is intended for companies such as construction companies that require detailed approval and management of multiple Change Orders in a single Job. Because the complete Change Order system requires all items added or modified in a Job to be controlled through the Change Order system, managing simple Change Orders can become more effort if it is worth.

If you need occasional Change Orders, it is much simpler to create a new Estimate with a single Phase called 'Change Order for Specific Items', where you replace 'Specific Items' with the details of your specific Change Order.

In that Estimate, add the appropriate Activities and outside Expenses. After the Change Order Estimate has been approved by your Client, go to Jobs and Approve the new Estimate. The Change Order Phase will be added to the Job as a new Phase and you can then schedule the Activities and purchase the outside Expenses. You can then manage and schedule the Job with the new Change Order Phase exactly as you manage and schedule regular Jobs.

Please email if any of this information needs additional clarification.

Victor Siegle

JobOrder is ingenious.

Friday, August 28, 2009

Information about JobOrder and Snow Leopard

Apple's latest operating system release, Macintosh OS X 10.6 ("Snow Leopard") is now available.

Please DO NOT install Macintosh OS X 10.6 on Macintosh computers running JobOrder at the present time.

Please DO NOT RUN JobOrder on new Macintosh computers preinstalled with Macintosh OS X 10.6.

Apple has changed some System privileges in the Library/Application Support folder that affect 4D, our development language.

We will post more information soon as we either have a workaround or more information about an upgrade. This information is current at 3:00 PM on Friday, August 28, 2009.

Please call or email if you have any questions.

Victor Siegle

Apple, Mac, OS X, and Snow Leopard are all registered trademarks of Apple Corporation. 4D is a registered trademark of 4D, Inc.

Monday, August 24, 2009

Bank Reconciliation

Bank Reconciliation in JobOrder 2009 is an example of a profound solution to a very complex real-life problem.

Bank Statements can now be reconciled for any period in the 3 current accounting years. JobOrder now stores both the Date of Bank Reconciliation (the date that appears on your bank statement) and the Date of Actual Reconciliation, which is the calendar date when you perform the reconciliation. Items are now color coded to show their reconciliation state, either un-reconciled or reconciled within the date range displayed or reconciled at a date later than the displayed date range. Until you see this feature in action you will not be able to visualize how powerful and useful it will be.


Bank Reconciliation also stores a History of Bank Statement Balances In a new area called 'Bank Reconciliation Snapshot', accessible through JobOrder Accounting.

Bank Reconciliation in JobOrder is an invaluable tool for monitoring cash on hand and resolving cash balance discrepancies. There are, however, several best practice procedures to make reconciling your cash accounts even easier:

Always have your bank statement on hand when reconciling. Reconciling from memory or based on a memo or email cannot match the accuracy of an official statement.

Reconcile as soon as you receive a statement from your bank. Reconciliation is a somewhat tedious, but necessary, exercise. Reconciling in a timely fashion just makes life easier.

Use deposit tickets. Either lump deposits using your own ticket number and store a copy with your receipt from the bank, or wait to create deposits in JobOrder until you have a ticket number from a bank receipt. Sometimes your bank statement will not itemize checks you deposit on your statement. Having a ticket number from your bank to reference in JobOrder makes reconciling deposits that much easier.

Please email if any of this information needs additional clarification.

Victor Siegle

JobOrder - Amplify business intelligence


Monday, August 17, 2009

Work Orders - Configure and Create

Work Orders are a valuable new feature in JobOrder. JobOrder has a powerful feature called Priorities, useful for assigning tasks in order of priority. A JobOrder customer wanted to assign Work Orders to Activities and to maintain a historical record of these Work Orders. By using the 'Terminology' feature of JobOrder to change 'Priorities' to 'Work Orders' we were able to provide them with a powerful Work Order subsystem almost effortlessly.

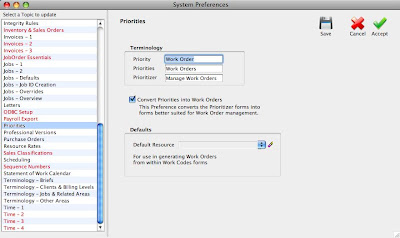
Go to System Preferences: Priorities and enter the values shown here:


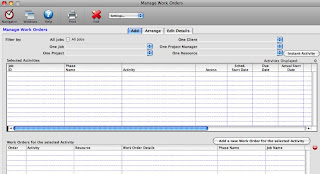
You can create new Work Orders either via the 'Manage Work Orders' Power Tool or directly in an Activity. We will discuss 'Manage Work Orders' first. In the Navigator search box at the top right, enter 'Manage Work Orders' and select it. You will see:


Using the Filters at the top, you can display Activities by Job, Project, Client, Project Manager or Resource.

When you have found the Activity for which you want to create a Work Order, please select it by clicking on it, and then click 'Add a new Work Order for the Selected Activity'.


You will then see a new window to enter the Work Order details:


Generally, you will NOT enter a Resource and will leave the Work Order blank ('Unassigned') at this stage. After entering appropriate information, please click 'Create Work Order'.

The Work Order will be created and a dialog about printing the Work Order will be displayed, as follows:


If you click 'Yes', the regular Custom Form dialog will be displayed and the new Work Order will be printed. Please make sure that you have added an appropriate Custom Form with the Form Name 'Work Order'.

Because the Work Order is a Custom Form, you can create essentially ANY format, fonts, images, and content for your Work Order. Either we can program the Work Order Custom Form for you or you can create your own, by learning to use the tools in the Custom Forms area.

When you return to the 'Manage Work Order' form, you will see the newly created Work Order in the 'Work Orders for selected Activity' grid at the bottom of the first page.

You can use the 'Arrange' tab to assign Work Orders to specific Resources, if necessary, by dragging Work Orders between Resources. The 'Select Resource' popup lists all Active Resources. If you scroll to the bottom of the popup, you will find an 'Unassigned' selection which can be used to show all Work Orders that have not been assigned to specific Resources.

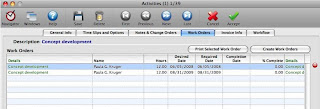
If you leave the 'Manage Work Orders' area and go into the Activities area, either by drilling down through a Job or by going directly to Activities, you will see a tab called "Work Orders'. This will display all the Work Orders that have been created for this Activity.


You can click on a Work Order and click 'Print Selected Work Order' to reprint an existing Work Order.

You can click 'Create Work Orders' to add a new Work Order to this Activity.

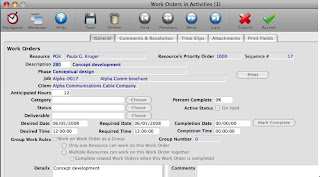
You can double-click on an existing Work Order to edit the Work Order. You will see:


This form contains all of the information related to a Work Order.

On the 'Print Fields' tab, JobOrder stores the values from when the Work Order was FIRST created, whether it was printed or not. 'Update Print Fields' will overwrite these values with the current values of the parent Activity.

Please email if any of this information needs additional clarification.

Victor Siegle

JobOrder - Bond with your business


Monday, August 10, 2009

Activity Allocation

An Activity is a component of a Phase, which is a component of a Job. If you think of a Phase as the stages of development of a Job (or a proposed Job, as created through an Estimate), then the Activities are the discrete parts of a Phase. They are the specific things you do, or steps you take, to accomplish a Job. Whereas a Phase may encompass weeks or even months, Activities are often only a few days or hours long.

Every Activity must be attached to a Phase. A Phase could theoretically have no Activities, only Expenses or Materials, but in most Jobs, every Phase will have at least one Activity.

Activities allow you to budget time in advance, to bill for time on completed Jobs, and to compose a work schedule. For this reason, Activities are one of the key ingredients of Jobs, and since Jobs are at the heart of JobOrder, you will likely visit the Activities Area frequently, usually through a Job.

In the process of creating an Estimate or Job, you may not know the detailed Activities that will be created later, but you do know the total number of hours that will be budgeted. JobOrder has recently introduced a concept called Activity Allocation that allows you to split up the total number of hours into specific Activities.

In an Estimate Overview or Job Overview, please select an existing Activity. When you select it, the green area display information about the selected Activity and displays an "Allocate" button. If you select the Allocate button, JobOrder will create a new Activity to use some or all of the budgeted hours of the original Activity. JobOrder will ask you to name the new Activity, will create it automatically, and will then display it for you to allocate some or all hours. The new Activity will have its Budget Hours default to the remaining hours of the original Activity.

After you Accept the new Activity, JobOrder will return to the Overview screen. The original Activity will now be displayed in orange with a "◊" sign in from of the Activity Description and the new Activity will be displayed in green indented below the original Activity. The original Activity will be adjusted to show the remaining Budgeted Hours that have not been allocated.

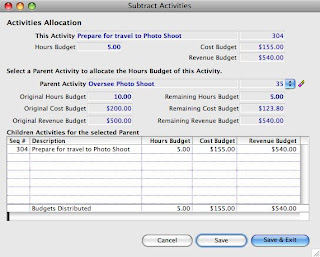
If you edit the new Activity, a new button called "Activity Allocation" will display the status of all the allocated Activities, as shown here:


Activity Allocation can be very useful if you have only an approximate idea of how much time will be required and want to learn from your actual experience by allocating from a pool of time. This is another good example of how JobOrder includes practical, easy to use features which provide great rewards to management.

Please email if any of this information needs additional clarification.

Victor Siegle

JobOrder – Bliss through knowledge


Monday, August 3, 2009

'To Do Manager' and 'Personal To Do' items


JobOrder has an interesting area called 'Priorities'. The Priorities Area is used to store records for the Prioritizer. A Priority is an Activity that has been assigned the order, precedence, or importance in which it should be completed. Priorities can be assigned to individual resources or can be temporarily left unassigned. You can only create Priorities in the Prioritizer, but you can edit them in the Priorities area. The Prioritizer allows you to manage Priorities by resource and to reassign them to other resources.

Because Activities are always contained in a specific Job, each Priority is, by definition, always connected to a specific Job. But it can be very useful to manage simpler Priorities, not assigned to specific Jobs. JobOrder calls these 'To Do' items and allows you to assign them either to specific resources or to leave them temporarily unassigned.


To Do items are managed in the 'To Do Manager' and in 'To Do Personal' which is a simplified manager designed for use by individuals managing their own To Do list. At the top of this post is a screen shot from JobOrder showing the relationship between Priorities, Work Orders, and To Do items.

In the To Do Manager, you can display To Do lists for 2 resources and you can drag between the 2 resources to reassign To Do items. You can also drag up-and-down an individual's list to reschedule their To Dos. Although To Do items can have an optional 'Date Required', generally To Do items are performed sequentially.

To Do items are a rapidly evolving concept in JobOrder. Please email with any suggestions or enhancement requests.

Victor Siegle

JobOrder is simple.


Monday, July 27, 2009

Prioritizer

For the next several weeks, we'll describe some unique features of JobOrder. Users can manage their time with Scheduled Time Slips and can enter Completed Time Slips in many ways.

In some organizations, tasks are performed sequentially, organized by importance. The Prioritizer allows you to organize tasks by importance and is used when the date due of a task is of secondary importance.

Prioritizer allows JobOrder users to define elegantly and simply the tasks to be performed by their Staff. The Prioritizer displays a dialog allowing you to display open Activities in open Jobs filtered by Jobs, Programs, Clients, Job Managers, or Resources.

The ‘Selected Activities’ area contains the following filtered columns:

Job Name or Job ID (depending upon what is selected as primary in Personal Preferences)
Phase
Activity Description
Access (“Full” or Team Name or Screen Name of Resource)
Scheduled Start Date
Due Date
Actual Start Date
Hours Budget
Hours Completed
Hours Scheduled
Hours Not Used
Revenue Budget (If Financial Access is enabled in Security Access)
Revenue Accumulated (If Financial Access is enabled in Security Access)
Revenue Balance (If Financial Access is enabled in Security Access)
Cost Budget (If Resource Financial Access is enabled in Security Access)
Cost Actual (If Resource Financial Access is enabled in Security Access)
Cost Balance (If Financial Access is enabled in Security Access)

In 'Selected Activities’ area, you can double-click on:

Job Name to edit Job
Phase Name to edit Phase
Activity Description to edit Activity
Access to edit Team, if it is a Team, otherwise Beep

Selecting an Activity in ‘Selected Activities’ populates the ‘Resources in Selected Activity’ area. The ‘Resources in Selected Activity’ area contains all Resources with access to the selected Activity.

You can click on the ‘Select’ column of a Resource row or use the ‘Quick Select’ popup to choose the Resources for which you will create Priorities for this Activity.

The ‘Quick Select’ popup allows you to select Resources by:

All Active Staff
Resources for Team…
Resources for Supervisor…

Clicking the ‘Create Priorities’ button brings up a dialog to define the new Priorities to be created. In the dialog you will create new Priorities, one for each selected Resource.

Clicking the ‘Create Priorities’ button brings up a dialog to define the new Priorities to be created. In the dialog you will create new Priorities, one for each selected Resource. JobOrder fills in the most appropriate defaults.

Permission to create Priorities for a specific Resource is granted to the Resource themselves, the Resource they report to, and the Job Manager of the Job containing the Priority. All Permissions are, of course, contingent upon appropriate Security Access.

Work Status radio buttons:

First button: Only one Resource can work on this item.

If one person clicks on this item in the Daily Log, the identical Priority will be deleted from the other Resources.

Second button: Multiple people can work on this item.

Each time a Resource opens this Priority, a comment will be added to Time Slip Details with their name and time. If a Resource enters a Completed Time slip or a partially completed Time slip for this item, another comment will be added to each related Time slip.

Second button: Multiple people can work on this item.

Each time a Resource opens this Priority, a comment will be added to Priority Details with their name and time.

If a Resource enters a Completed Time slip or a Scheduled Time slip for this Priority, another comment will be added to each related Priority.

Check box for ‘Complete related Priority’ when Completion = 100%.

We added 2 areas for ‘Priorities for...’.

Each area contains a popup with every person with Time slip Access in the selected Activity.
Each area contains the following columns:
Activity Description
Time slip Details
Phase
Job
% Completed
Date Completed
Priority Number

When creating Priorities, if the first ‘Priorities for...’ area is empty, the first Resource populates the first area.

When creating Priorities, if the second ‘Priorities for...’ area is empty, the second Resource populates the second area.

If the ‘Priorities for...’ areas already have Resources, JobOrder will refresh them automatically when creating new Priorities.

Additional selected Resources will not change the 'Priorities for' areas automatically. They will have to be selected individually via the popups.

We allow the user to drag a Priority slip higher or lower in one area, or from one area to another to switch Resources.

Double click on a Priority to edit a Priority record. The editing form will display a subform with all the Time Slips linked to the Priority being edited. In this Priority record, clicking on the "Delink" button next to the Time subform will 'delink' the Priority from the Time slip. We have added a button named 'Delink' instead of '-' in order to be specific that the Time slip is not being deleted, just being disassociated with this Priority.

In a Priority record, we have added the ability to attach files, just like Documentation.

In 'Priorities for' we added a mechanism to place Priorities ‘On Hold’. A check box for ‘On Hold’ allows you to show only Active Priorities or all Priorities. ‘On Hold’ is separate from the "-" button. You can place a Priority On Hold whether or not it has linked Time slips. Priorities can be linked to either Completed or Scheduled Time slips.

Each of the two 'Priorities for' areas has a ‘Done’ popup, showing how many days of ‘Done’ items to display:

Today
2 days
3 days
7 days
14 days
This month (beginning from the first day of the current month)
Last month (beginning from the first day of the previous month)
This year (beginning from the first day of the current year)
Last year (beginning from the first day of the previous year)
Show All
Hide All (default)

Each of the two 'Priorities for' areas has a ‘To Do’ popup showing how many open Priority items to display.

10 (default)
25
50
100
All

'Lowest priority' always means the lowest priority of the _displayed_ Priority Time slips. The average person may have hundreds of Priority Time slips, but they only work on the ones they are looking at, selected with the 'Active' query for 1, 10, 25, or whatever number of items.

The Active items will be displayed with consecutive numbers as 1,2,3,4, etc.

In 'Priorities for' we have added a popup for 'Filter Priorities by' with a popup for:

All (default)
Past Desired Date
Past Required Date
Desired this Week
Required this Week
Resolved this Week
Changed this Week
Priorities for selected Activity
Priorities for selected Phase
Priorities for selected Job

Priorities for selected Client (if these are selected, we keep them in the original order, so they may be displayed as 1,4,12,26, etc.)

We have added an additional element to all the Resource popups and lists called "Unassigned", with a Resource Number of 0.

This keeps this ‘Unassigned’ Resource separate from specific resource queries, and allows us to easily see the Priorities which are not attached to a Resource. No real Time Slips can be attached to these Unassigned Priorities.

On the Prioritizer dialog, we added a button for 'Instant Activity'. After an Activity has been added, the Prioritizer is refreshed.

Tabs in Prioritizer

Tabs are labeled:

Add
Arrange
Edit Details

The ‘Arrange’ tab shows the Priorities for 2 selected Resources, allowing you to drag between the two.

The ‘Edit Details’ tab shows the Priorities for one selected Resource and a text block containing the Priority Details for the selected Priority, similar to Instant Traffic Status.

Daily Log

In Daily Log, both Time slips and Priorities will be displayed as separate areas.

When selecting a Priority, we display a new dialog, similar to the existing Scheduled Time slip dialog. You can enter the actual hours (or actual start-stop time). JobOrder will create a new Time slip and will update the existing Priority with the Completion %.

In Daily Log, we allow completed Priorities to be used again to create new Time slips, just by clicking on them.

When a Time slip is created from a Priority, JobOrder looks at the Work Status radio buttons and takes the appropriate actions:

If “Only one Resource can work on this item’ is enabled:

If one person clicks on this item in the Daily Log, the identical Priority records will be deleted from the other Resources.

If “ Multiple people can work on this item” is enabled:

Second button: Multiple people can work on this item.

Each time a Resource opens this Priority, a comment will be added to Priority Details with their name and time.

If a Resource enters a Completed Time slip or a Scheduled Time slip for this Priority, another comment will be added to each related Priority.

If the field “Complete related Priority’ is enable, when Completion = 100%” all other related Priority Items are marked complete.

Notification Rules

In Notification Rules, we have added new rules for:

Priority has been added
Priority has been changed
Priority has been completed (important for Contacts at Clients, in addition to regular Resources)
Priority has changed from Active to On Hold or from On Hold to Active.
Priority Required Date due in less than xx days
Priority Desired Date due in less than xx days.

Please email if any of this information needs additional clarification.

Victor Siegle

JobOrder enhances productivity.