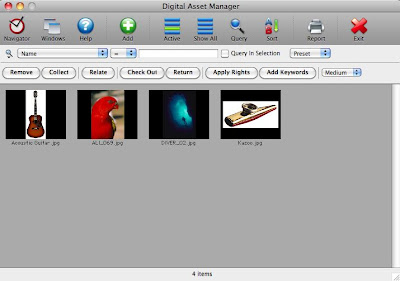
In the example, one of the assets (“Acoustic Guitar.jpg”) is selected, as indicated by a red outline.
• To select an item and unselect any other items that are already selected, click the desired item.
• To select or unselect an item without affecting the status of other items, hold down Control (Windows) or Command (Macintosh) while clicking it.
• To select a contiguous range of items, click the first item in the group, then hold down Shift while clicking the last item in the group.
The size of the thumbnails can be adjusted using the pop-up menu just above the thumbnail tray.
Searching for Assets by Any Indexed Field or by Keyword
You can search for assets based on the information associated with the assets, such as asset number or type, creation date, and so on. A full list of the available fields appears on a pop-up menu below the button bar, next to the small magnifying glass icon ( ). To search for assets:
1. Choose the field to search using the pop-up field menu.
2. Choose an operator from the pop-up menu to the right of the field menu.
You can choose to search for assets where the selected field is exactly equal (=) to the value you enter, not equal (#), greater than (>), greater than or equal (>=), and so forth.
3. Enter the information you are searching for in the field to the right of the operator pop-up menu.
If you are searching on the Inactive field or by keyword, a pop-up menu appears instead, allowing you to choose True or False for the value of Inactive, or a keyword if you are searching by keyword.
4. Mark the Query in Selection checkbox if you want to search only the currently selected assets. Otherwise all displayed assets are searched.
The Digital Asset Manager continuously searches as you specify your search terms. Thumbnails of items that do not match the search query disappear from the thumbnail tray, leaving only the items that do match. To clear the query and display the thumbnails of all available items, click the Show All button in the button bar.
You can also conduct searches via the Query button (with the larger magnifying glass) in the Button Bar. The query dialog works the same way it does throughout JobOrder.
Using Preset Queries to Find Assets
As a shortcut, a number of commonly used search queries are available from the Preset pop-up menu. These queries display a dialog to let you enter or select the desired value.
For example, to search for all the items that share a relationship, choose Query by Relationship from the Preset pop-up menu. A dialog like the one at right appears, displaying the available relationships. After you choose the desired relationship, only the thumbnails of assets sharing that relationship are displayed in the thumbnail tray. All other thumbnails are hidden.
The available preset queries include:
• Query by Description: Enter the text to be found in the description of the assets.
• Query by Keywords: Select one or more keywords assigned to the assets.
• Query by Keywords in Current Selection: As above, but only searches currently selected assets.
• Query by Partial Keyword: Enter the text to be found in the keywords assigned to the assets.
• Query by Relationship: Select a relationship shared by the assets. (See the Relationships page of the Digital Assets record.)
• Query by Rights Contract text: Enter the text to be found in the Rights Contract of the assets.
• Query for Active Digital Assets: Shows only assets that are not marked as Inactive.
• Search by Path: Enter the text to be found in the file system path of the assets. Useful for finding all assets on a particular server or in a particular folder.
• Show All Related Assets for the Selected Assets. Finds assets that share a relationship with the selected assets. You mark related assets by selecting them, then clicking the Relate button.
After you complete a search query, thumbnails of items that do not match disappear from the thumbnail tray, leaving only the items that do match. To clear the query and display the thumbnails of all available items, click the Show All button in the button bar.
Adding and Removing Assets
To add assets to the Digital Asset Manager, drag them to the main Digital Asset Manager window from the Finder (Macintosh) or Explorer (Windows). Alternatively, click the Add button in the button bar, and then choose Add File or Add Folder. When adding a folder, all the contents of the folder and all the folders it contains are added.
When you have opened the Digital Asset Manager from a Job record, the new assets are automatically assigned to that Job. If you opened the Digital Asset Manager from the Plan menu at the main JobOrder menu screen, new assets are not assigned to a Job. (However, you can assign assets to a Job by clicking the Assign button and selecting the desired Job.)
JobOrder can generate thumbnails for most graphics formats (TIFF, JPEG, GIF, PNG, PDF, etc.). Generating thumbnails may take a moment, especially for a large number of files. Non-graphics files can still be organized and managed, but they will appear in the Digital Asset Manager with generic icons.
After you add items to the Digital Asset Manager, the existing items are hidden and the new items are shown alone as a convenience, since you might want to assign relationships or apply rights to them immediately. To display the thumbnails of all available items again, click the Show All button in the button bar.
To remove assets, first select the assets to be removed, then click the Remove button. You will be asked to confirm their removal. Note that this only removes items from the Digital Asset Manager; it does not delete the original asset from your computer’s hard disk or a network file server.
Collecting Assets
When you are ready to send a piece out for printing, JobOrder can conveniently gather the assets you need into a specified folder. Note that you must have access to the assets being gathered on your computer’s hard disk or a network file server, as the assets themselves are not stored in JobOrder. Select the assets you need (for example, by searching on keyword or description, then selecting all of those), and then click the Collect button.
JobOrder first confirms that you wish to collect the selected items, and then asks whether the assets should be grouped into folders. Depending on your answer, JobOrder will do the following:
• Yes: Assets that were originally in different folders on your computer’s hard disk or a network file server will be copied into separate subfolders inside the collection folder.
• No: All assets will be copied directly into the collection folder, without creating subfolders.
After you choose whether to group the collected assets into subfolders, collection begins. Collection only copies files; the original files are not moved or touched.
Checking Out and Returning Assets
To help manage changes to assets, assets should be checked out while they are being edited. Only one JobOrder user can check out a given asset at a time. Once checked out, an asset must be returned before it can be checked out by another user.
To check out assets, select them in the thumbnail tray, and then click Check Out. For convenience, the items being checked out are shown alone in the Digital Asset Manager (all other items are hidden). To display the thumbnails of all available items again, click the Show All button in the button bar.
After you have finished working with assets, check them back in by selecting them in the Digital Asset Manager, then clicking Return. JobOrder prompts you for a note to be attached to the asset’s Check Out and Return History, indicating the reason for the checkout.
Applying Rights to Assets
Each asset in the Digital Asset Manager can have rights associated with it, to remind you how your license for the asset allows you to use it (for example, print only or Web only). Rights can be edited for individual assets in the Rights Management tab of the Digital Assets record window, which we will describe later. However, since it is common for assets to have similar rights, JobOrder lets you assign rights in the Digital Asset Manager thumbnail tray, copying a right from an asset that already has it to one or more other assets.
To apply a right to one or more digital assets:
1. Select the assets to which the rights should be applied.
2. Click the Apply Rights button.
A floating Apply Rights window, similar to the one shown at right, appears.
3. Select the asset that has the rights you want to copy.
The name of the asset will appear in the Apply Rights window.
4. Choose the right to be copied using the pop-up menu below the source asset’s name.
5. Click Apply.
Editing Digital Asset Records
To edit a Digital Asset’s record, double-click its thumbnail in the Digital Asset Manager. The Digital Asset record has five pages: General, Assignments & Checkout, Notes, Rights Management, and Relationships.
General
The General page of the Digital Asset record contains general information about the digital asset, including its name and categorization, information about the image (if the asset is an image) and the disk file, and a thumbnail, description, and keywords.
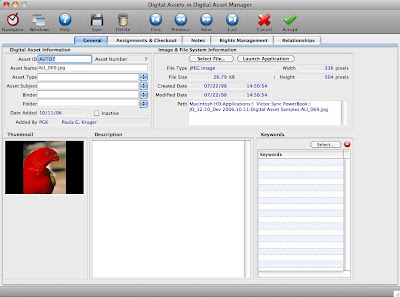
Digital Asset Information
• Asset ID. JobOrder automatically generates Asset IDs when you add new digital assets (the format is the word “AUTO” plus a number), but the generated ID can be edited if the items already have IDs you wish to use.
• Asset Number. Records the automatically generated sequence number of a digital asset.
• Asset Name. JobOrder automatically fills this field with the name of the digital asset’s file, but the name can be edited. Changing the name here does not affect the name of the file on your computer’s hard disk or a network file server where the digital asset resides.
• Asset Type. Optionally enter the type of asset, or select a previously used asset type from the adjacent pop-up menu.
• Asset Subject. Optionally enter the subject of the asset, or select a previously used asset subject from the adjacent pop-up menu.
• Binder. Optionally enter the name of the binder that contains the asset, or select a previously used binder name from the adjacent pop-up menu. This field can be used to organize assets separately from their organization on disk.
• Folder. Optionally enter the name of the folder that contains the asset, or select a previously used folder name from the adjacent pop-up menu. Like Binder, this field can be used to organize assets separately from their organization on disk. (The field is not related to the folder in which the asset is stored on your computer’s hard disk or a network file server.)
• Date Added. Automatically records the date this digital asset was added to the Digital Asset Manager.
• Inactive. Mark this checkbox to have this digital asset excluded from a search query for active assets. You might mark this checkbox for old versions of assets which you wish to keep associated with a given Job even though they are no longer being used.
• Added By. Automatically records the name of the person who added this asset.
Image and File System Information
• Select File. Click this button to select the file on your computer’s hard disk or a network file server that contains this asset. Use this function if the asset has been moved on the disk and can no longer be found.
• Launch Application. Click this button to open this asset in the application your computer usually uses to open this type of file. You must have access to the asset’s disk file.
• File Type. Automatically records the file type of the asset.
• File Size. Automatically records the size of the asset’s file in kilobytes.
• Created Date, Modified Date. Automatically records the date and time the asset’s file was created and modified. (Note that this is different from the Date Added field, which records when the asset was added to the Digital Asset Manager.)
• Path. Automatically records the file system path to the asset’s file.
• Width, Height. Automatically records the width and height for image assets.
Thumbnail, Description, and Keywords
• Thumbnail. Displays a thumbnail of the image for most types of image assets, or a generic document icon for non-image assets.
• Description. Enter a description of the asset.
• Keywords. Lists the keywords assigned to this asset, which can later be used to find particular kinds of assets or asset subjects. Select keywords that describe this image by clicking the Select button, or remove keywords by selecting them and clicking the - button.
When selecting keywords, a dialog appears that lets you select which of the previously used keywords apply to this asset. Click the desired keywords to mark them for inclusion (or to unmark a marked keyword). Click the Add Keyword button to create a new keyword. Click Exit after you have marked all the desired keywords.
Assignments and Checkout
The Assignments & Checkout page of the Digital Asset record allows you to add and remove job assignments and to check out and return the Asset.
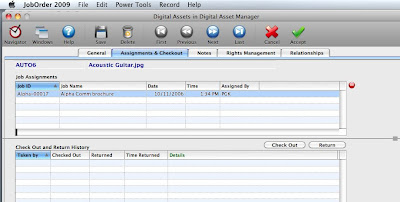
• Job Assignments. This subform lists the jobs with which this asset is associated. Assets are assigned to Jobs in two ways: by adding assets when the Digital Asset Manager has been opened from a Job record (which assigns them to that Job), or by clicking the Assign button when the Digital Asset Manager has been opened from the Plan menu at the main JobOrder menu screen. You can de-assign an asset from a Job by selecting the Job in this subform and clicking the - button. Double-click a record in this subform to display more details about a job assignment.
• Check Out and Return History. This subform lists the occasions on which this asset has been checked out. Use this when an asset needs to be used exclusively by one staff member (e.g. for editing) for some period of time. When an asset is checked out, it cannot be used by other JobOrder users. Click Check Out to check out the asset. Click Return to return the asset and make it available for other JobOrder users (you will be prompted to enter a note about what you were doing with it). Double-click a record in this subform to display more details about a checkout event.
Notes
The Notes page (not shown) contains the Notes subform, a convenient alternative to the Notes Center for viewing and adding Notes associated with this digital asset.
• Double-click to view or edit an existing Note.
• + Enters a new Note about this Digital Asset and adds it to the Subform.
• - Deletes a selected Note.
Rights Management
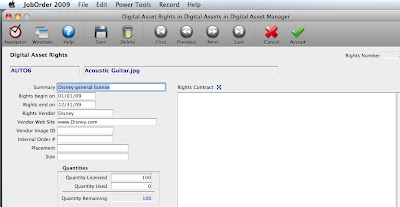
The Rights Management page (not shown) contains the Rights Contracts subform, which allows you to keep track of which rights you have purchased for this asset, their duration, the vendor from which the rights were purchased, and quantities involved. For example, if you have licensed a photograph to be used in a maximum of 50,000 brochures during this year, this information can be recorded and tracked to avoid overrunning the license and incurring costly penalties.
• Double-click to view or edit an existing Rights Contract.
• + Enters a new Rights Contract for this Digital Asset.
• - Deletes a selected Rights Contract.
When entering or editing a Rights Contract, the Digital Assets Rights page, shown below, appears to allow you to record the duration of the license, information about the vendor, quantities, and even the contract itself.
Relationships
The Relationships page (not shown) contains a subform that allows you to review the relationships an asset is part of. You might mark as related any number of assets that are all of the same subject, or in the same style, or of the same type (illustration, photo, etc.), from the same session, or for any other kind of relationship you can think of. Each type of relationship can be given a name and assigned easily to assets by selecting them in the Digital Asset Manager thumbnail tray and clicking the Relate button.
• Relationships vs. Keywords. Relationships and keywords are both ways of “tagging” assets and can be used for many of the same purposes. The difference is primarily one of how you create them and how you use them later. Relationships can be easily assigned to more than one asset at a time right from the thumbnail tray, while keywords can only be easily edited in individual records. You can search by any particular keyword, but not by relationship—instead, the Preset menu in the thumbnail tray has a query that finds other assets that share a relationship with the selected assets.
You might use keywords for broad categories you might want to search on (e.g. “animals,” “landscapes,” “product,” etc.), while using Relationships to track images of the same subject, from the same photo shoot, or for the same client. It will all depend on your organization’s working style.
To remove a relationship from the asset, select it in the Relationships subform and click the - button.
Digital Asset Manager Preferences
At the bottom of the Documentation page in the JobOrder System Preferences is a checkbox labeled “Store Digital Assets as files, not just as Thumbnails.” (Opening the System Preferences requires an access level of Database Administrator.)
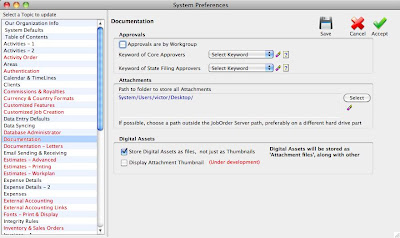
If this checkbox is marked, JobOrder copies each file added to the Digital Asset Manager to a folder inside the Attachments folder selected at the top of the page. Each asset’s record then points to JobOrder’s copy of the asset. This folder can be shared on the network so that all JobOrder users have access to all asset files.
Please email if any of this information needs additional clarification.
Victor Siegle
JobOrder enhances productivity.


